WebSocket protocol
WebSocket is an advanced standard for full-duplex (two-way) communication between a client and a third-party service in real-time. It is used to organize continuous data exchange while keeping the connection open. No extra HTTP requests are needed.
Our platform provides the WebSocket module to connect with other web services. With this module, you can create outgoing and accept incoming WebSocket connections and easily send data through them.
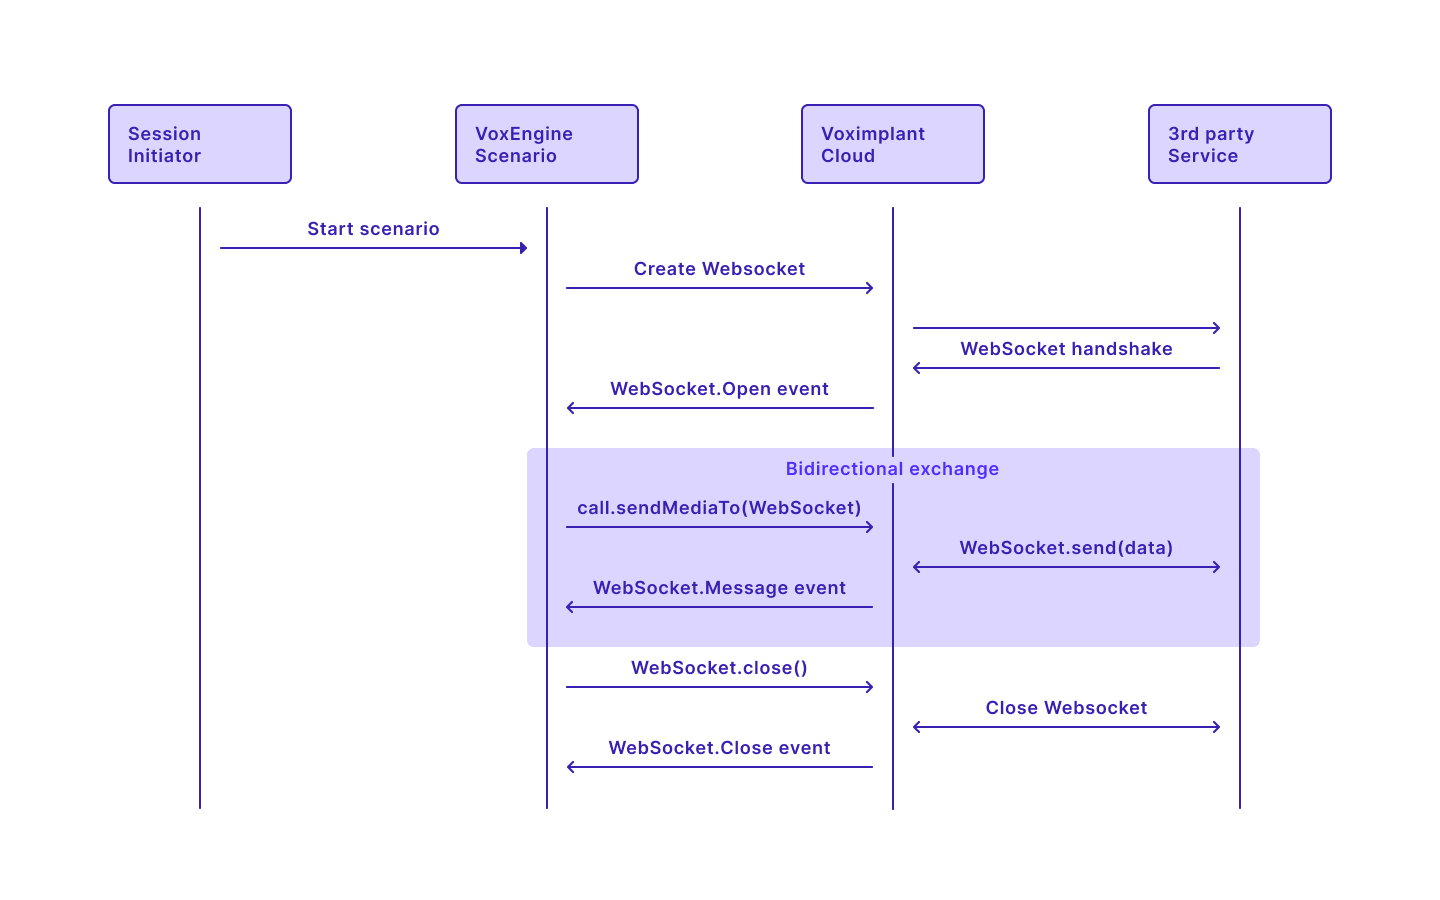
Outbound connection
The first thing you should do is create a WebSocket object via the VoxEngine.createWebSocket method. It accepts 2 parameters: URL in the format of 'wss: // + domain + path' and protocols (optional).
Then you can send data via the WebSocket via the call.sendMediaTo method. In the case of audio, you can set a required encoding format, a tag, and some custom parameters. If you do not set an encoding, PCM8 is selected by default. The WebSocket.send method, in turn, sends a decoded data stream in JSON format via the WebSocket. Thus, you get messages from the service handling your requests.
The WebSocket.close method closes the connection. Please note that the connection can be closed both from the client side and the server side.
See the picture below to learn how it all works:

The code for connecting to a web service looks like this:
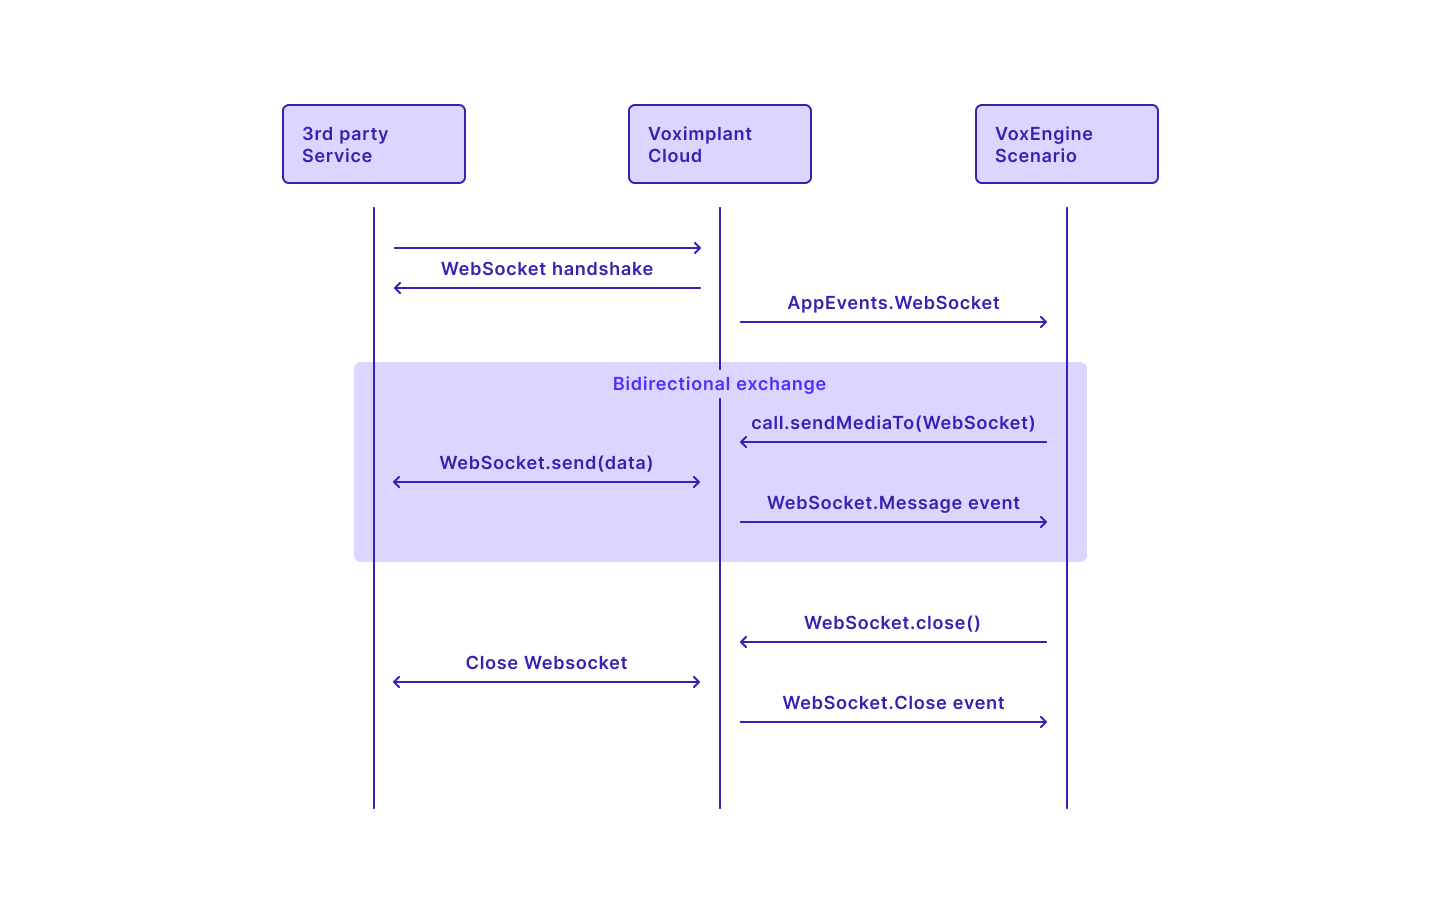
Inbound connection
To make incoming WebSocket connections available, use the VoxEngine.allowWebSocketConnections method. Then, subscribe to the AppEvents.WebSocket event. Now you will receive a corresponding event every time a connection is made to the session URL. Also, you can get a WebSocket object: event.WebSocket.
Session URL can be obtained from the API response of the StartScenarios method or directly from the AppEvents.Started event. Please note that 'https' should be changed to 'wss' in the URL.
Once the connection is established, you can send data via the WebSocket via the call.sendMediaTo method.
See the picture below to learn how it all works:

The sample code for accepting incoming connections looks like this:
The maximum number of incoming WebSocket connections cannot be bigger than the number of calls in one session + 3. Trying to make one more connection leads to an error and triggers the NewWebSocketFailed event. Existing connections are not destroyed after a call is ended.
Sending audio and text data via WebSocket
To send text via WebSocket, use the WebSocket.send method:
Use an echo server to check that everything works properly:
To send audio via WebSocket, use the call.sendMediaTo method. Here you can set a preferred encoding format, a tag, and some custom parameters. If you do not set an encoding, PCM8 is selected by default.
Sending audio from a WebSocket to a call is also possible. You can do it either by initiating a WebSocket connection from the scenario as it was explained above, or accepting an incoming WebSocket connection.
Here is an example of how to accept an incoming WebSocket connection and receive audio. You need to prepare a WebSocket URL to access the current call and send the URL to the call. After you receive the URL, you can use it to send an audio to the call.
See the following code example to understand how it works:
After you receive the URL from the call, pass it to your server code. For example:
node server_code.js wss://example_link
See the server code example that sends the audio file to the call.
When sending an audio file via the WebSocket protocol, set the audio chunk duration to 20 milliseconds. If you set the audio chunk duration to any other value, the audio may play at the wrong speed. You can see how to set the audio chunk duration in the code above.
The given server code example accepts a waveform audio file with the raw pcm u-law 8 khz mono format. You can use the ffmpeg utility to convert other formats into the suitable one in the following way:
ffmpeg -i ./record.mp3 -f mulaw -acodec pcm_mulaw -ac 1 -ar 8000 output.raw
Here is the protocol for transmitting audio data via WebSocket (it works both ways, so use it when you send audio to WebSocket and from WebSocket to a call):
- Data stream description
{
 "event": "start", // audio stream start
 "sequenceNumber": "0", // message counter
 "start": {
   "tag": "incoming", // tag in sendMediaBetween
   "mediaFormat": {
     "encoding": "audio/x-mulaw",
     "sampleRate": 8000,
     "channels": 1
   },
    "customParameters": {
        "text1":"12312" // any text
  }
 }
}
- Data stream termination
{
 "event": "stop",
 "sequenceNumber": "777",
  "stop": {
    "tag": "incoming", // tag in sendMediaBetween
    "mediaInfo": {
            "bytesSent": 21100, // audio bytes before base64
            "duration": 124, // sec
        }
    }
}
- Data stream format
{
 "event": "media",
 "sequenceNumber": "2",
 "media": {
   "tag": "incoming",
   "chunk": "1",      // message count within one tag
   "timestamp": "5",  // to synchronize audio streams if needed
   "payload": "no+JhoaJjpzSHxAKBgYJ...=="
 }
}
Learn more about setting up the Voximplant side and the server side to send audio to a third-party service in the Connect external STT providers article.
