Jitsi Meet
Jitsi Meet, a popular open-source project for video conferencing and remote meetings, uses Voximplant and its Interactive Voice Response (IVR) functions for incoming dialing. This guide shows how Jitsi Meet self-installers can use Voximplant to replicate the call-in and IVR functionality found on meet.jit.si and how to add outgoing dialing from Meet. It starts with some architecture for context and then provides a step-by-step guide with easy-to-reuse code for setting up Jigasi (Jitsi’s SIP gateway) and Voximplant’s environment.
Architecture
Jitsi Meet, with its internal components, can scale to support tens of millions of users. In this article, we connect public switched telephone network (PSTN) phone network callers with Jitsi Meet mobile and web users. The relevant parts are highlighted in blue boxes in the diagram below.
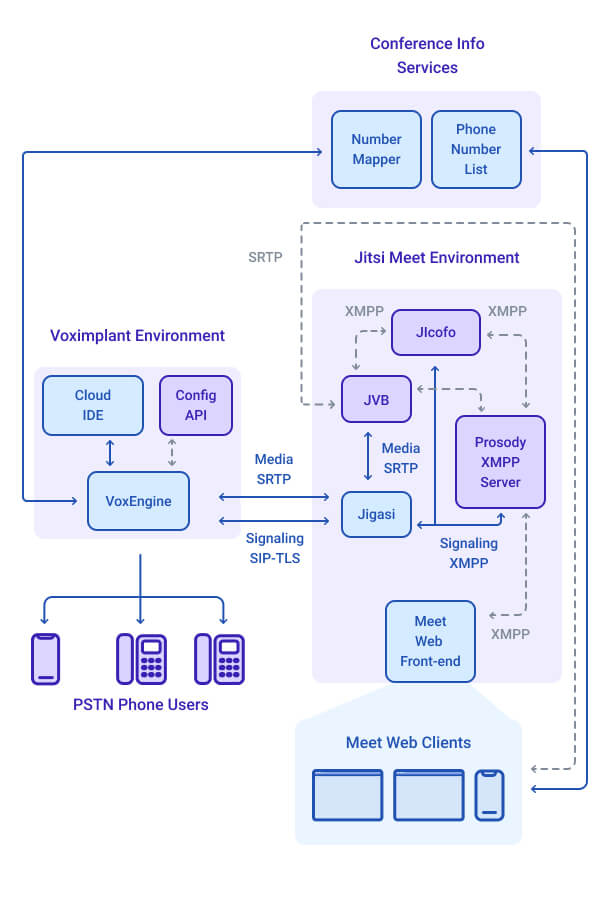
Jitsi Meet with Jigasi
Jitsi Meet, a front-end web application, utilizes WebRTC media and XMPP for signaling. Jigasi, a SIP gateway service, is designed to work seamlessly with Jitsi Meet. Jigasi takes SIP signaling and RTP media from SIP devices and converts them into Jitsi’s XMPP signaling with WebRTC-compatible media.
For incoming calls, originating from the PSTN phone network and entering Jitsi Meet, Jigasi establishes a connection to the corresponding Meet server. The Jitsi Video Bridge (JVB) component then relays the incoming media. Conversely, for outgoing calls, initiated by a Jitsi Meet user to the phone network, the Jicofo component identifies available Jigasi units and establishes a connection to one.
Voximplant
In this architecture, VoxEngine is used to:
- Receive incoming calls and gather bridge ID and password information via an IVR.
- Send outgoing calls from Jigasi to the PSTN.
- Manage mute and kick functions for those PSTN callers during the call.
Jigasi optimization features
To enhance the performance of the Jigasi gateways, Voximplant introduced some unique features. For instance, Voximplant supports intrasession SSRC mixing, which multiplexes multiple media streams into a single session. This feature helps reduce memory and port management processing in Jigasi.
In addition, Voximplant supports RTP Header Extensions for Client-to-Mixer Audio Level Indication (RFC6464). This means that Voximplant sends audio-level information to Jitsi Meet. Jitsi Meet uses this information as part of its last-N protocol to identify the active speaker and adjust the view accordingly. By offloading this processing from Jitsi Meet, Voximplant enhances its scalability.
Conference info services
Jitsi Meet’s user interface assumes that users can connect to any conference on the system by calling a single pool of dial-in numbers. To achieve this, the meet.jit.si service utilizes a number mapper service to link each created conference, such as meet.jit.si/voximplant, to a unique numeric PIN that remains constant as long as it’s used once every 30 days. This PIN is designed to be easily inputted on the phone using DTMF by the caller, ensuring they join the appropriate conference.
When a conference is initiated online, Meet submits the URL to the number mapper, which then returns the PIN. If no PIN is available, a new one is generated. Subsequently, Jitsi Meet displays this information to users when they click on conference details or attempt to share the meeting information. When a PSTN user joins the conference, VoxEngine makes an HTTP request to retrieve the PIN information and then includes the appropriate conference room in a SIP header.
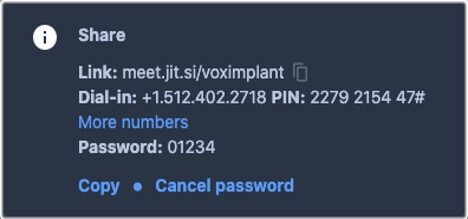
In addition, a phone number list service is used to retrieve one or more dial-in numbers that can be used to dial into the service. While not mandatory for your own Jitsi Meet service, the Meet UI expects a phone number list service to be configured if Jigasi is enabled.
Set up Jigasi with Voximplant
The instructions assume that you:
- Already have Jitsi Meet installed.
- Have access to navigate and configure your Jitsi Meet installation.
- Have rudimentary JavaScript coding skills.
- Are running an all-in-one Jitsi configuration and are okay with adding a single Jigasi server on the same machine.
Let us break these instructions into three major sections:
- Setting up Voximplant – some basic provisioning and a high-level code walkthrough.
- Configuring the Conference Info Services – you do the minimum required here.
- Configuring Jigasi.
Values from each of these steps are required in the other steps, so be prepared to jump between systems. You can install Jigasi first and go back later and enter the appropriate SIP parameters.
Set up Voximplant
For general information on getting started with Voximplant, check out the quick start here. Here is a short step-by-step guide on how to set up Voximplant for use with Jigasi.
- Go to voximplant.com and create an account if you do not have one already.
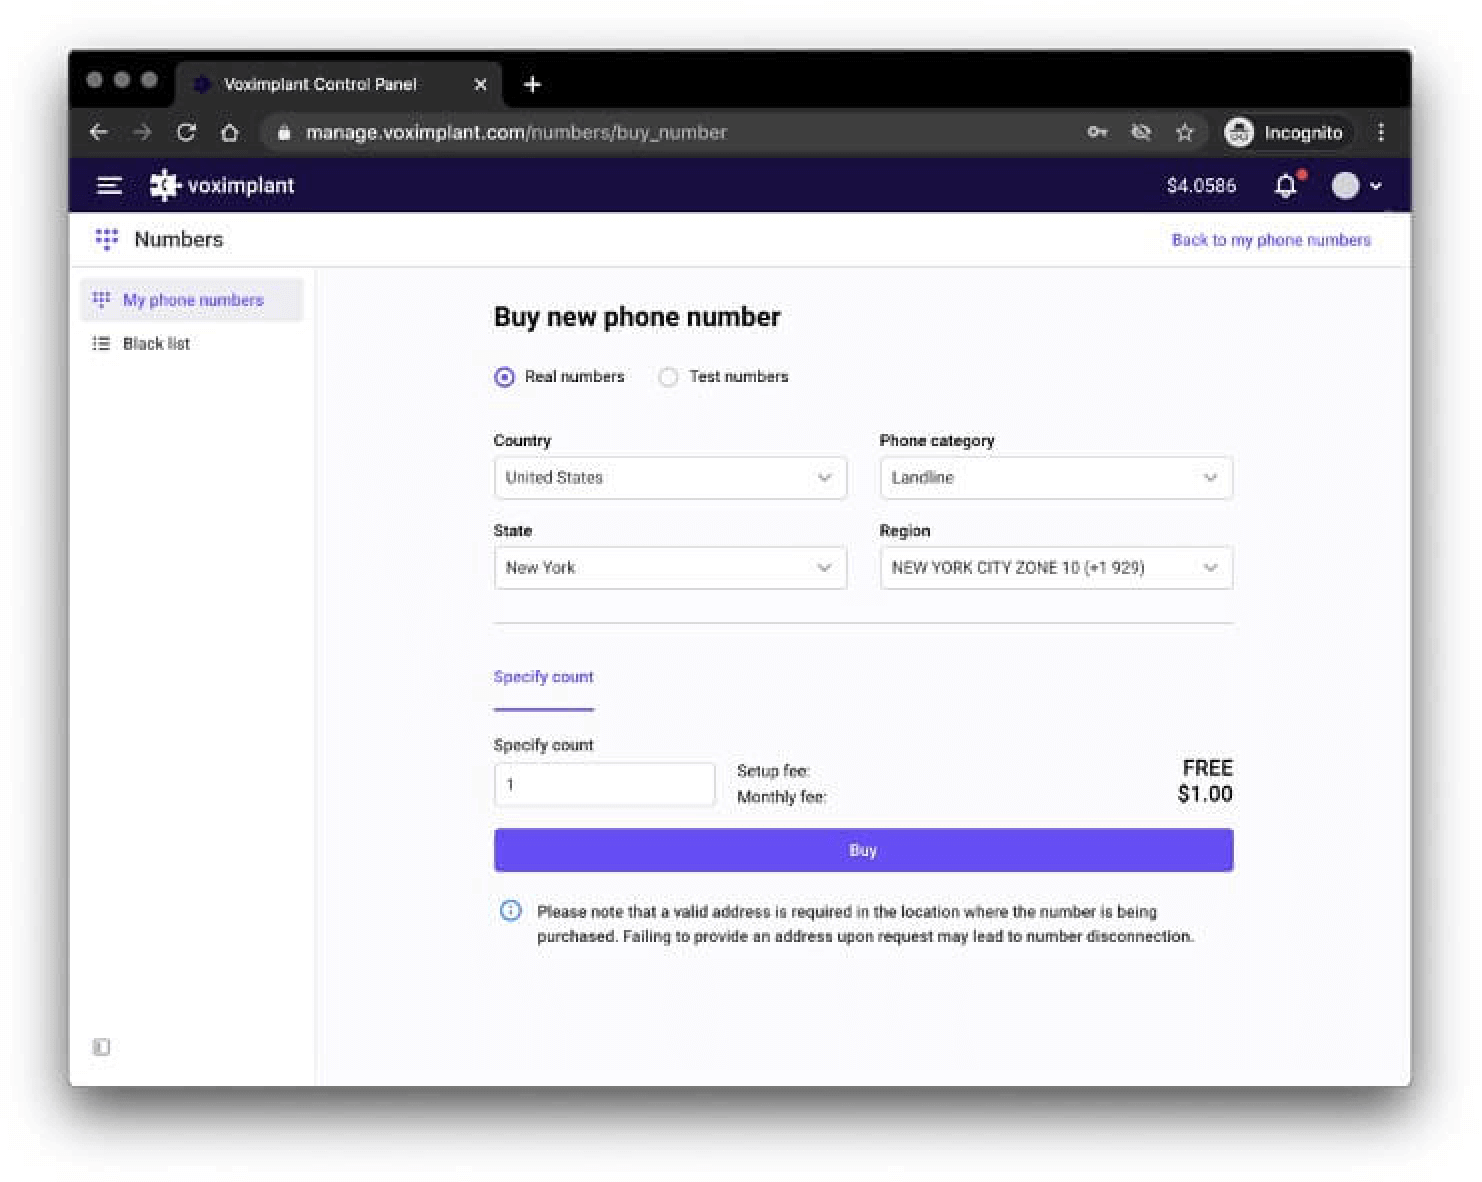
- Purchase a phone number. Go to the main menu in the upper left, select numbers, and click to buy a new one:
- Create an application and open it.
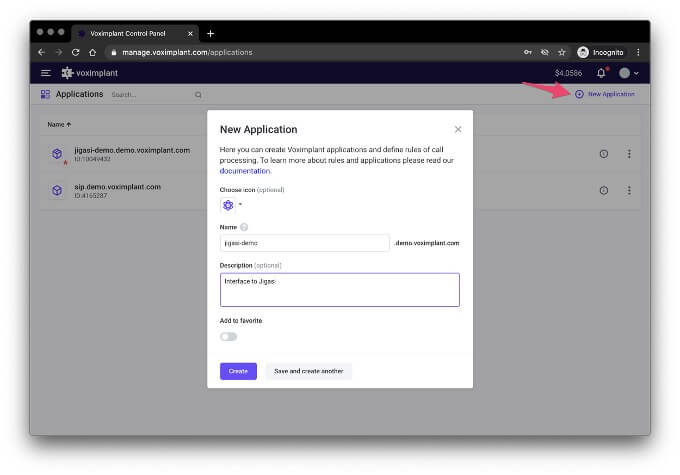
- Assign the number to the application.
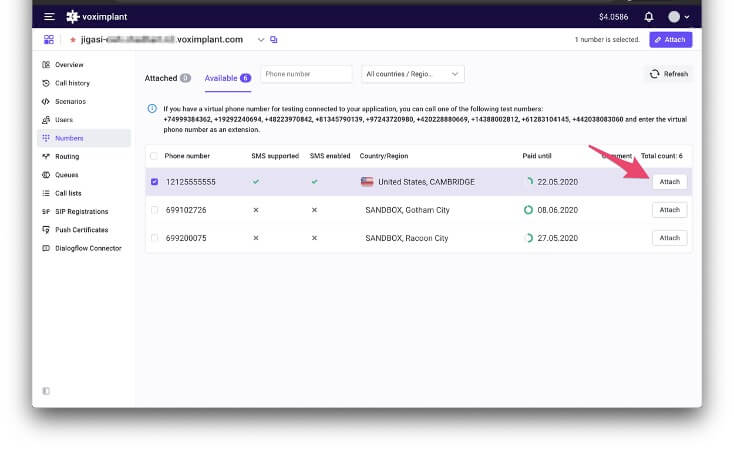
Select “All Rules” for now.
- Create a user.
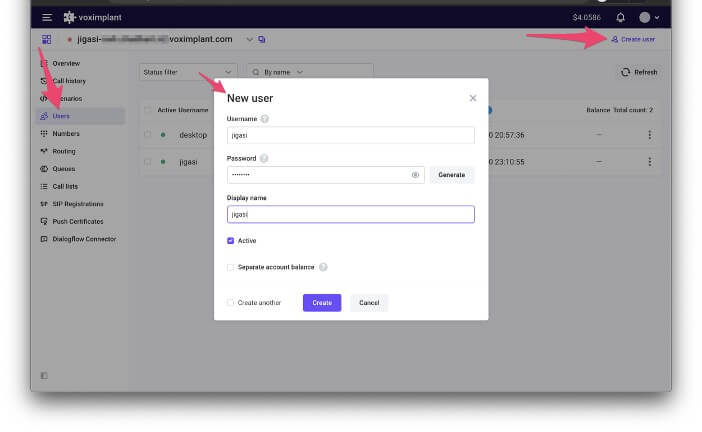
This creates SIP user credentials that Jigasi uses to register with Voximplant.
In addition to creating a user for Jigasi, it would also be good to create a second user for testing with Jitsi Desktop. Jitsi Desktop is a desktop SIP client application that uses the same SIP stack, most of the same settings as Jigasi, and is helpful for SIP testing to Voximplant independent of all the Meet components.
- Create an incoming scenario. Go to scenarios and create a new Jigasi Incoming scenario for handling incoming calls from the PSTN to Jigasi.
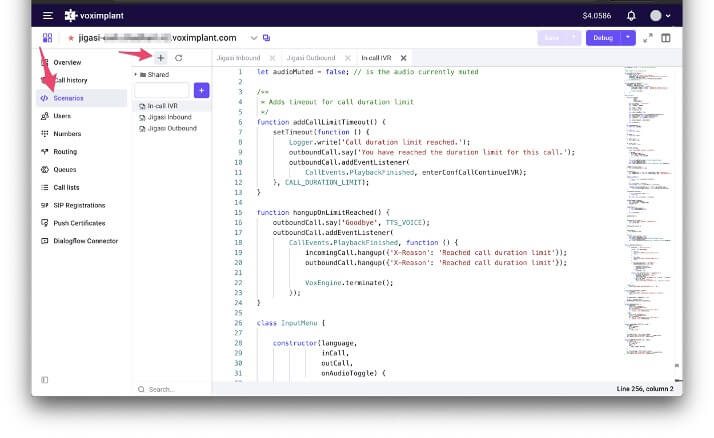
Paste all the code from here into the scenario.
Create an outgoing scenario. Repeat the procedure above for outgoing. The code is available here. Find more information about what this code is doing in the VoxEngine code walkthrough section.
Create a mute IVR scenario. Do this one more time for the mute IVR using this code.
Configure rules. The last thing you need to do is configure how incoming calls are handled. Go to Routing and create a new rule by clicking New Rule in the upper right corner.
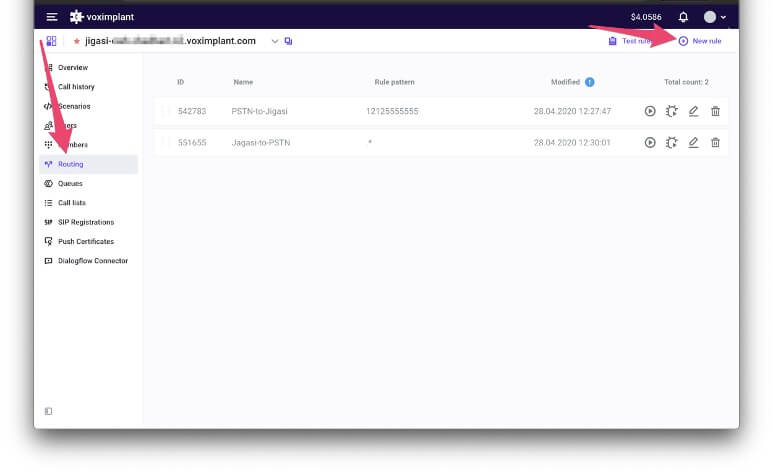
Incoming rule
Create a rule for calls from the PSTN. Voximplant routes calls based on the SIP “to” field. For calls from the PSTN, the to field is the purchased PSTN number. Enter that number into the pattern box:
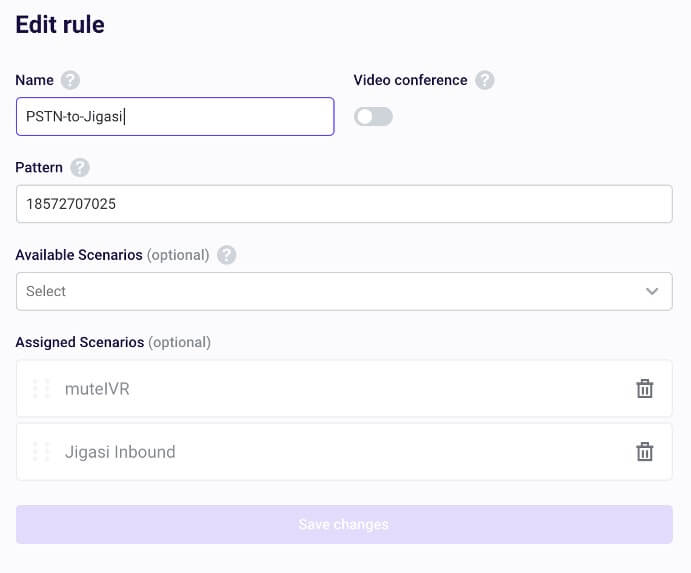
If you have multiple numbers assigned, you can use a regular expression to match additional incoming numbers.
Select the muteIVR scenario from the Available Scenarios dropdown and then add the Jigasi Incoming scenario you created earlier. Note that the order is important here. The incoming scenario expects global variables from the muteIVR scenario to be available before loading.
Outgoing rule
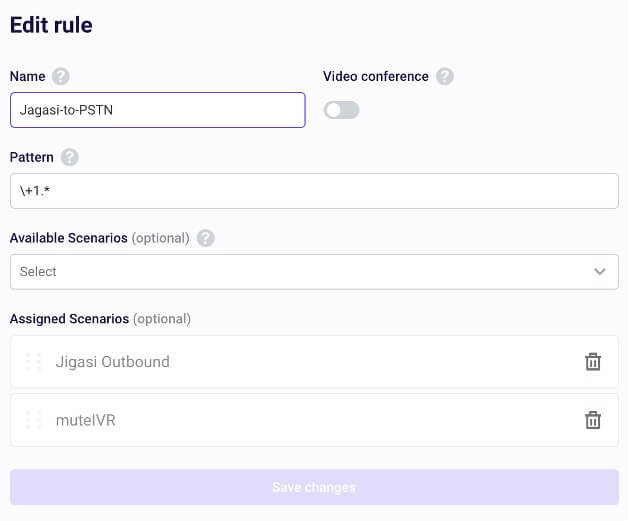
Repeat the same steps for the outgoing scenario from Jigasi to the PSTN. If you want your users to have the ability to call any phone number in the world, you can use the .* regular expression. For instance, in the example below, you can limit calls to the United States only based on the +1 country code:
Rule order
You now have two rules: one forwards calls to your incoming number, and the other allows all US numbers to dial out. Voximplant executes these rules in order. Before the outgoing rule, ensure you have the incoming rule that filters on a specific number (or numbers). Otherwise, any incoming call could be picked up by the outgoing rule!

VoxEngine code
All the code you need is located in Voximplant’s jitsi-connector GitHub repo. Make sure you copy the code from there as that is updated more frequently than this article.
Jigasi to PSTN scenario
Let’s start with the outgoing scenario since that is a simple one that doesn’t use any IVR interaction.
Globals and constants
Start with some global variables for the call objects and configuration options:
Make sure you populate the phone numbers you purchased with Voximplant under DIDS. You are probably starting with a single number, but don’t forget you can add local numbers for additional countries. In the case of calling out from Jitsi Meet to a user, if you had a French number populated above, then if you called a user in France, the French number would show on the caller ID.
Answer a call from Jigasi
VoxEngine manages each leg of the call independently. When the user enters a phone number to make a call, Jigasi initiates an outgoing SIP call to VoxEngine. First, you need to answer that SIP call leg.
Once you answer, read a message to the Jitsi Meet bridge to let them know the call is going through. Use an event listener at the end of that playback to initiate the outgoing call:
Add an outgoing call leg
Wait for a callback that is triggered when the previous prompt finishes. That callback simply dials out to the PSTN leg:
Pass control to the muteIVR
After setting up the call, you must initiate the In-call mute IVR to monitor mute/unmute signals. This can be achieved by creating a new InputMenu instance and initiating it.
PSTN to Jigasi scenario
The incoming scenario is similar to the outgoing example, except it adds an IVR and an HTTP request to your Number Mapper service to look up the proper conference URL.
Set the constants
Make sure to specify the Voximplant user you created above and adjust the other parameters as needed:
IVR
Declare the IVR module at the top of your code:
IVRs are defined by establishing a series of states. In each state, the developer specifies a prompt for the user to respond to. The user enters information using DTMF keys, which is then analyzed by the program. Depending on the analysis results, the program either terminates, transitions to a new state, or repeats the current state. To create a new state, a new instance of the IVRState class is created, specifying a name, IVR parameters such as the prompt, and a handler for analyzing the data and determining the appropriate action when no input is provided.
Our incoming pre-conference IVR is simple, with only 2 states:
conferenceNumber— have the user enter their conference number.confgetpassword— have the user enter the conference passcode.
You need another service to determine if the given conference has a password set. For simplicity, ask the user to enter # if there is no password.
Number mapper
VoxEngine has an httpRequest method you can use to make REST API calls. Use the PIN the user entered to make that HTTP call, save that info, and move along to the next IVR state.
Pass the conference information to Jigasi
Lastly, you need to send the information gathered by the IVR to Jigasi. The incoming call handling (not shown here) is similar to the outgoing scenario. For the outgoing call leg, you need to add SIP headers with the conference URL and passcode (if required) when initiating the call.
Use the mixStreams and audioLevelExtension options to optimize performance.
muteIVR scenario
The muteIVR scenario handles:
IVR states for muting
Starting the mute-control IVR
Communicating audio state information with Jigasi
Total call duration timeout
Let’s touch on a few of these.
IVR states
To allow the phone user to control their audio, introduce two states: one for mute and one for unmute. These states monitor for the *6 command and call the sendMuteRequest function when pressed. Additionally, incorporate logic to initiate the IVR, which can be triggered from both incoming and outgoing scenarios.
Handle messages to and from Jigasi
Instead of muting the call locally using Voximplant, request Meet to mute the call. This way, the Meet UI will indicate that the caller is muted. When the asterisk (*) is pressed, a SIP INFO message is sent to Jigasi via the call.sendInfo method and the muteRequest message.
A similar function handles the muteResponse when the bridge requests the caller to mute. In this scenario, include a timeoutHandler helper function to prevent calls from exceeding a specified limit. This helps prevent abuse and missed hang-ups.
And the function that sets the mute state based on the information that Jigasi sends:
Conference info services setup
The Jitsi team has a Swagger definition doc for phone number list and conference mapper HTTP endpoints. In this example, set up a simple static phone number response and reuse Jitsi’s public API for the conference mapper.
Phone number list
You can examine how the phone number list service works with meet.jit.si:
curl ‘https://api.jitsi.net/phoneNumberList?conference=voximplant@conference.meet.jit.si’
It returns a JSON object with a list of phone numbers in the following format:
{"message":"Phone numbers available.","numbers":
{"US":["+1.512.402.2718"],"UK":
["+44.121.468.3154"],"France":
["+33.1.84.88.6478"],"Germany":
["+49.89.380.38719"],"Netherlands":
["+31.85.208.1541"],"Spain":
["+34.932.205.409"],"Canada":
["+1.647.243.6108"],"Australia":
["+61.8.7150.1136"],"Brazil":
["+55.21.3500.0112"],"Japan":
["+81.3.4510.2372"],"Switzerland":
["+41.61.588.0496"]},"numbersEnabled":true}
To return the phone number(s) you configured in the Voximplant setup, you need something. You can create a service on the Meet Jitsi service to send this information, but for quick demonstration purposes, use a service like Mocky.io to return the phone number JSON object.
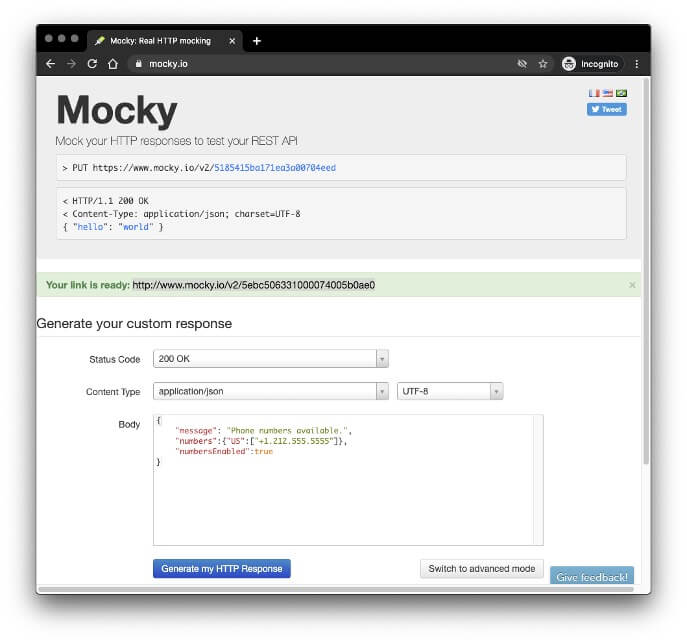
Now a request to the indicated Mocky.io URL returns the following:
{
    "message": "Phone numbers available.",
    "numbers":{"US":["+1.212.555.5555"]},
    "numbersEnabled":true
}
You need this URL to configure Jigasi.
As an alternative to running your own number mapper service or using something like mocky.io, you can create a local file on your Jitsi Meet server to host your numbers too. This works well for single-system installs where your numbers won’t change often. On the Debian Jitsi Meet install, the default location for hosting static files is /usr/share/jitsi-meet/. Place the JSON object in a file in that directory -i.e. phone_numbers.json and then you can access that file from https://meet.yourdomain.tld/phone_numbers.json.
Conference mapper
As explained earlier, the conference mapper is more intricate because it’s designed to generate a distinct PIN for every newly created conference. It must simultaneously receive requests from Jitsi Meet to provide the PIN for a specific room URL and from VoxEngine to map a room URL to a user-provided PIN.
If you intend to restrict your users to calling only a limited number of conference URLs, you could create a straightforward service, as illustrated in the Phone Number List above. Alternatively, you could leverage Jitsi’s publicly available API for this purpose.
For example, if you want to find the ID for https://meet.jit.si/voximplant:
curl 'https://api.jitsi.net/conferenceMapper?conference=voximplant@conference.meet.jit.si'
{
  "message": "Successfully retrieved conference mapping",
  "id": 2279215447,
  "conference": "voximplant@conference.meet.jit.si"
}
The reverse operation to map a PIN to a URL looks like:
curl 'https://api.jitsi.net/conferenceMapper?id=2279215447’
and gives the same response as above.
When creating the conference, ensure you replace “meet.jit.si” with your own domain name. This API can then be utilized for your own Meet deployment.
Note that the conferenceMapper URL is used as the MAPPER_URL in the incoming VoxEngine scenario.
Install and configure Jigasi
Jigasi is relatively simple to install and configure. You need to run the installer and edit the text files with the appropriate values.
Installation
Jitsi’s quick install instructions have an option for installing Jigasi, and the Jigasi repo has its own set here.
Installing Jigasi from the Debian package is simple:
apt-get -y install jigasi
This asks you for the SIP username and password you created in step 5 of the Voximplant setup.
Configuration
The Jigasi configuration files are located in /etc/jitsi/jigasi in the standard Debian install. The settings you specified during the installation should be in /etc/jitsi/jigasi/config:
# Jigasi settings
JIGASI_SIPUSER=jigasi@jigasi-demo.demo.voximplant.com
JIGASI_SIPPWD=dDhiSHpRa3I=
JIGASI_SECRET=A#LtRa5V
JIGASI_OPTS=""
JIGASI_HOSTNAME=meet.voximplant.com
JIGASI_HOST=localhost
Note that the password is hashed.
SIP communicator properties
The more important file is /etc/jitsi/jigasi/sip-communicator.properties. Note that most of the lines have a unique account ID for your instance - make sure you change this to match your instance - i.e. the number after acc in net.java.sip.communicator.impl.protocol.sip.acc012345678901 needs to be updated.
Edit/add the following to that file:
net.java.sip.communicator.impl.neomedia.audioSystem.audiosilence.captureDevice_list=["AudioSilenceCaptureDevice:noTransferData"]
net.java.sip.communicator.impl.protocol.sip.acc012345678901.USE_TRANSLATOR_IN_CONFERENCE=true
org.jitsi.jigasi.xmpp.acc.USE_TRANSLATOR_IN_CONFERENCE=true
net.java.sip.communicator.service.gui.ALWAYS_TRUST_MODE_ENABLED=true
Set a few items for VoxEngine:
# VoxEngine
# Use standard X- header
net.java.sip.communicator.impl.protocol.sip.acc012345678901.JITSI_MEET_ROOM_HEADER_NAME=X-Room-Name

# don’t overload Jigasi with focus changes
net.java.sip.communicator.impl.protocol.sip.SKIP_REINVITE_ON_FOCUS_CHANGE_PROP=true

# can be enabled to disable audio mixing and use translator, jigasi acts as jvb, just forward every ssrc stream it receives.
net.java.sip.communicator.impl.protocol.sip.acc012345678901.USE_TRANSLATOR_IN_CONFERENCE=true
org.jitsi.jigasi.xmpp.acc.USE_TRANSLATOR_IN_CONFERENCE=true

# allow a conference to start muted
org.jitsi.jigasi.ENABLE_SIP_STARTMUTED=true
Lastly, adjust your codec settings to force the use of OPUS for optimal performance:
net.java.sip.communicator.impl.protocol.sip.acc1403273890647.Encodings.AMR-WB/16000=0
net.java.sip.communicator.impl.protocol.sip.acc1403273890647.Encodings.G722/8000=0
net.java.sip.communicator.impl.protocol.sip.acc1403273890647.Encodings.GSM/8000=0
net.java.sip.communicator.impl.protocol.sip.acc1403273890647.Encodings.H263-1998/90000=0
net.java.sip.communicator.impl.protocol.sip.acc1403273890647.Encodings.H264/90000=0
net.java.sip.communicator.impl.protocol.sip.acc1403273890647.Encodings.PCMA/8000=0
net.java.sip.communicator.impl.protocol.sip.acc1403273890647.Encodings.PCMU/8000=0
net.java.sip.communicator.impl.protocol.sip.acc1403273890647.Encodings.SILK/12000=0
net.java.sip.communicator.impl.protocol.sip.acc1403273890647.Encodings.SILK/16000=0
net.java.sip.communicator.impl.protocol.sip.acc1403273890647.Encodings.SILK/24000=0
net.java.sip.communicator.impl.protocol.sip.acc1403273890647.Encodings.SILK/8000=0
net.java.sip.communicator.impl.protocol.sip.acc1403273890647.Encodings.VP8/90000=0
net.java.sip.communicator.impl.protocol.sip.acc1403273890647.Encodings.iLBC/8000=0
net.java.sip.communicator.impl.protocol.sip.acc1403273890647.Encodings.speex/16000=0
net.java.sip.communicator.impl.protocol.sip.acc1403273890647.Encodings.speex/32000=0
net.java.sip.communicator.impl.protocol.sip.acc1403273890647.Encodings.speex/8000=0
net.java.sip.communicator.impl.protocol.sip.acc1403273890647.Encodings.red/90000=0
net.java.sip.communicator.impl.protocol.sip.acc1403273890647.Encodings.ulpfec/90000=0
Setting all these codecs to 0 ensures they are disabled. Make sure you are left with the following:
net.java.sip.communicator.impl.protocol.sip.acc1403273890647.Encodings.opus/48000=1000
net.java.sip.communicator.impl.protocol.sip.acc1403273890647.Encodings.telephone-event/8000=1
net.java.sip.communicator.impl.protocol.sip.acc1403273890647.OVERRIDE_ENCODINGS=true
Save that file and restart Jigasi.
sudo service jigasi restart
Configure Meet
Next, give Meet your Conference info URLs:
nano /etc/jitsi/meet/[your-domain]-config.js
Find/uncomment/add and populate these values with what you specified from the Conference Info Services Setup:
     dialInNumbersUrl: "https://www.mocky.io/v2/5e96723b2fff000f03025a44",
     dialInConfCodeUrl: "https://api.jitsi.net/conferenceMapper",
Add the call-out button to Meet
If you want to give your users the ability to dial-out from their conference, add the add users icon to your Meet interface:
nano /usr/share/jitsi-meet/interface_config.js
Add ‘invite’ inside the TOOLBAR_BUTTONS option:
TOOLBAR_BUTTONS: [
        'microphone', 'camera', 'closedcaptions', 'desktop', 'fullscreen',
        'fodeviceselection', 'hangup', 'profile', 'info', 'chat', 'recording',
        'livestreaming', 'etherpad', 'sharedvideo', 'settings', 'raisehand',
        'videoquality', 'filmstrip', 'invite', 'feedback', 'stats', 'shortcuts',
        'tileview', 'videobackgroundblur', 'download', 'help', 'mute-everyone',
        'e2ee', 'localrecording'
    ],
Try it!
Load up a Meet URL in your browser and give it a try! To dial out, click the “+”:

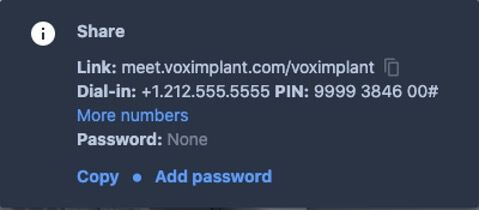
Check to make sure your number with PIN shows in the conference info panel and give your number a call:
Make it your own
Now that you have an idea of how the system works, there are many ways to optimize with Voximplant:
- Add new numbers for other regions or countries.
- Whitelist incoming callers for certain Meet URLs without authorization.
- Add an authorization PIN for outgoing calling.
- Add outgoing SIP calling.
- Use speech recognition to say a room name instead of entering it.
- Connect to a PBX or even an existing conferencing system.
