SIP trunking
With Voximplant, you can connect the Ultravox LLM service to an existing SIP telephony server. This allows you to use Ultravox AI assistants to handle your calls and assist your customers right from your existing infrastructure.
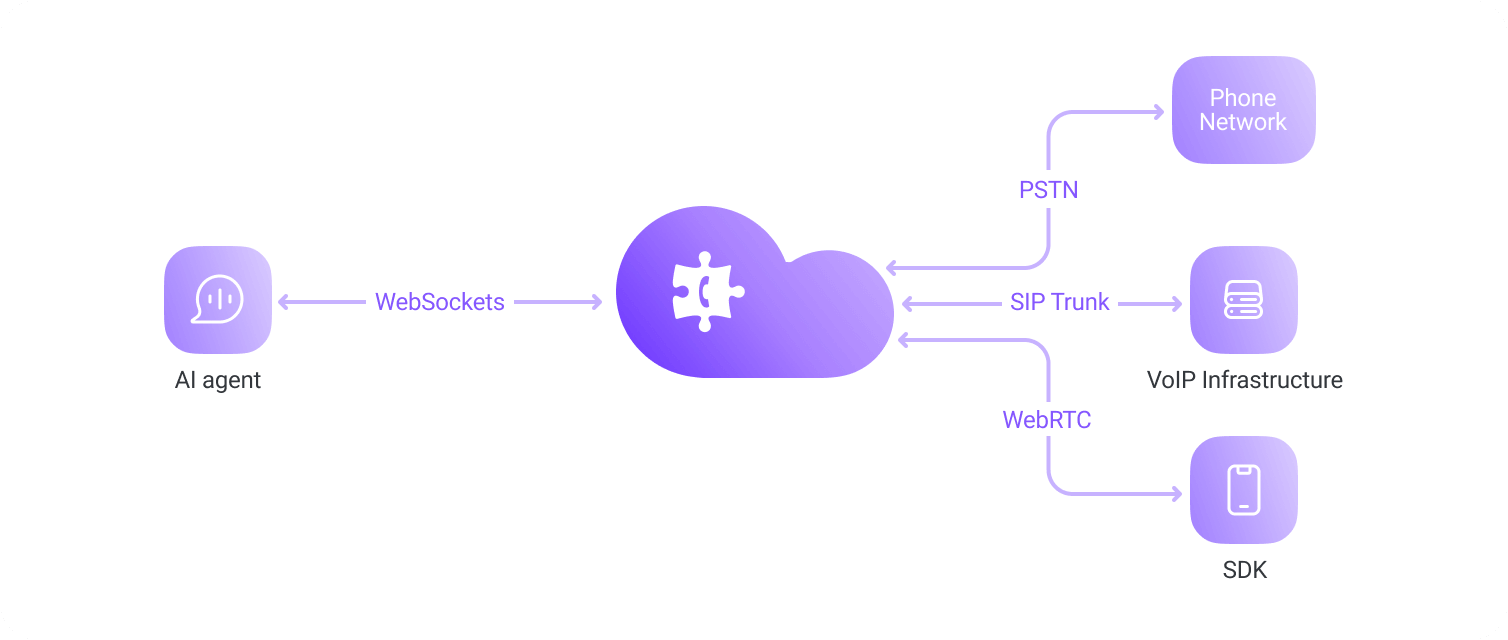
Voximplant acts as a gateway, managing connection with Ultravox via WebSockets and making/receiving calls via SIP.

Contents
Handling incoming calls
Follow the steps below to connect Ultravox to your SIP PBX server.
Create a Voximplant application
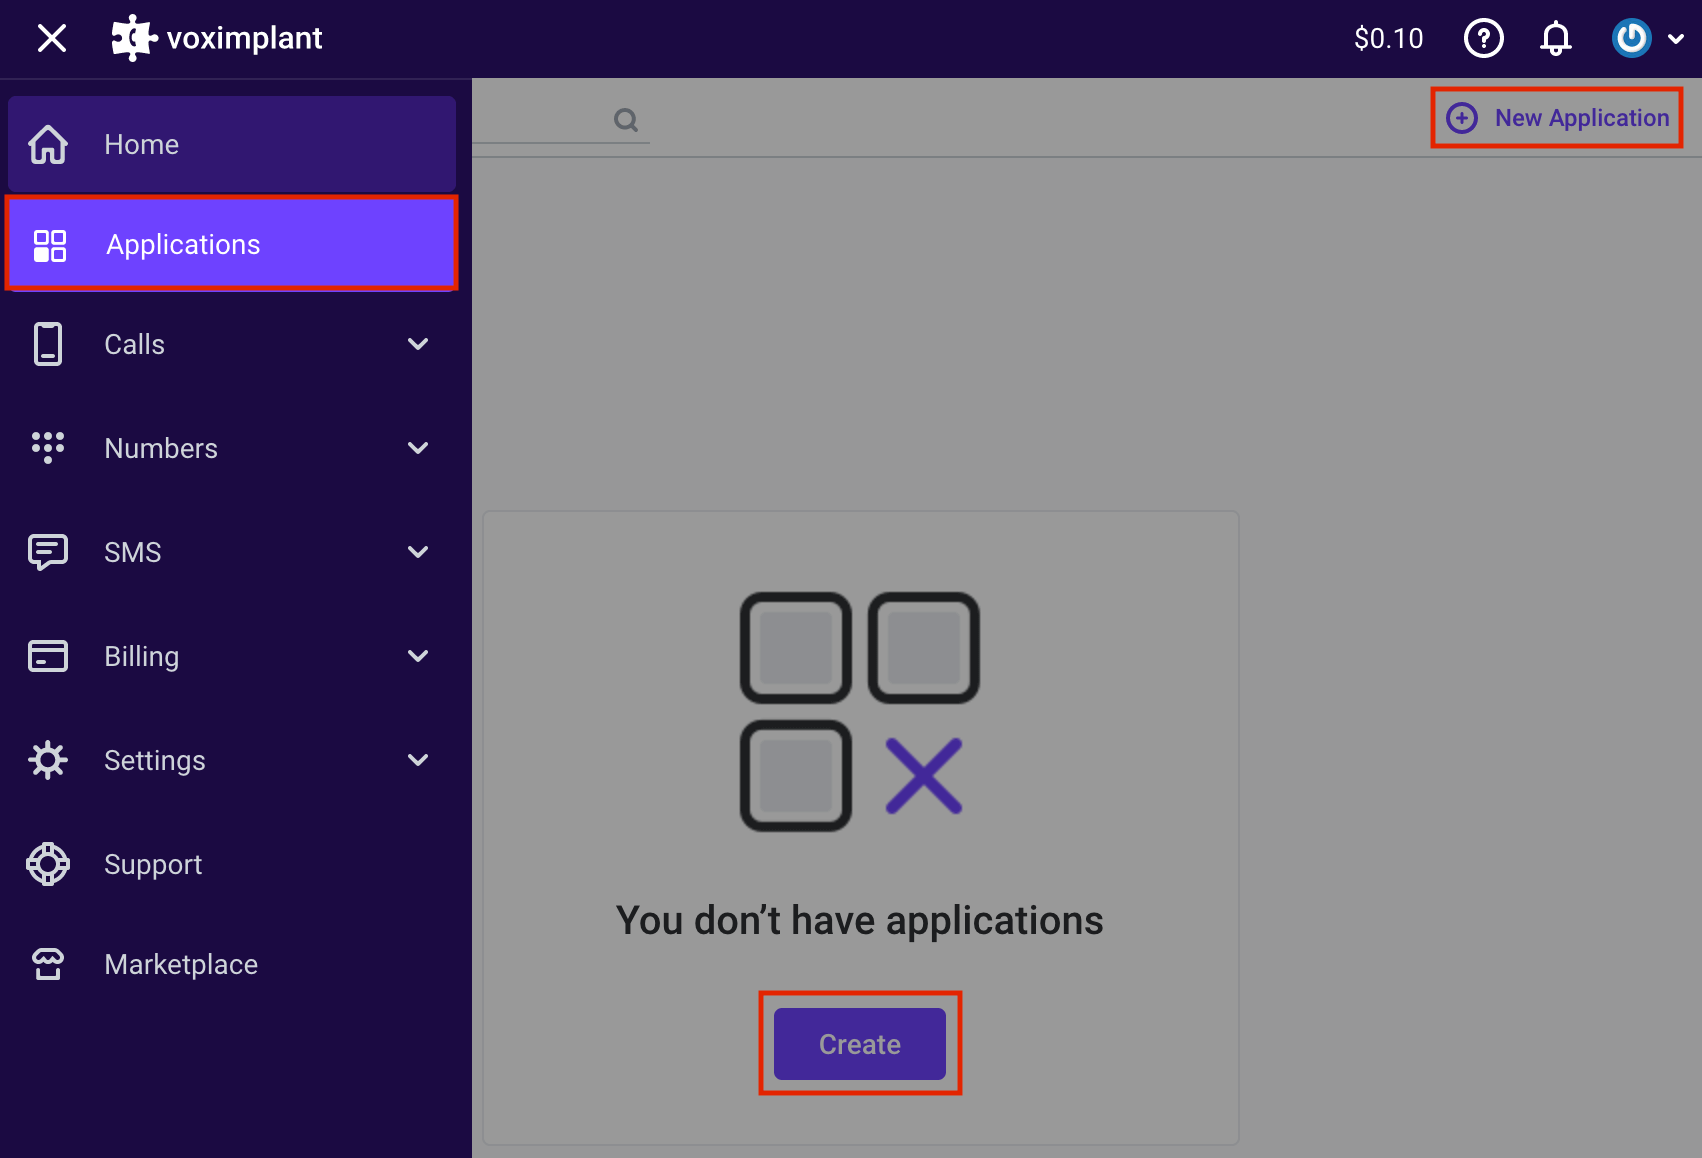
To create an application, log in to your Voximplant account or create a new one. Then, navigate to the application section from the upper left corner of the page. Click New application in the upper right corner or Create at the bottom of the page.

This opens a new application editor window where you can set it up and save by clicking Create. The newly created app appears in the application list. To modify its name, icon, or description, click the three dots menu and select Edit.

You can learn more about Voximplant applications and their sections in the Getting started → Applications section of this documentation.
Create scenarios within the application
Scenarios in Voximplant are JavaScript documents within a Voximplant application, where you can implement logic processing calls and messages.
To create a scenario, open your existing or newly created application application, and select Scenarios on the left menu, and click on the plus icon to create a new scenario. Give it a name.

This opens a new tab in the online IDE on the right, where you can write your code. If needed, you can rename the scenario or modify the source code later.
You can learn more about scenarios and their best practice tips in the Getting started → Scenarios section of this documentation.
Utilize our ready-to-use scenarios
To connect your SIP PBX with the Ultravox LLM, we prepared ready-to use scenarios for incoming and outgoing calls.
We have hidden sensitive information in these scenarios, such as API keys, with placeholders. Please, replace the placeholders with your actual Ultravox credentials.
Here is the incoming scenario for processing incoming calls forwarded to Voximplant:
Create routing rules
Routing rules in a Voximplant applications define when and on what conditions to launch existing scenarios. When an incoming call arrives or you make call via your SIP PBX server, a routing rule decides which scenario to launch.
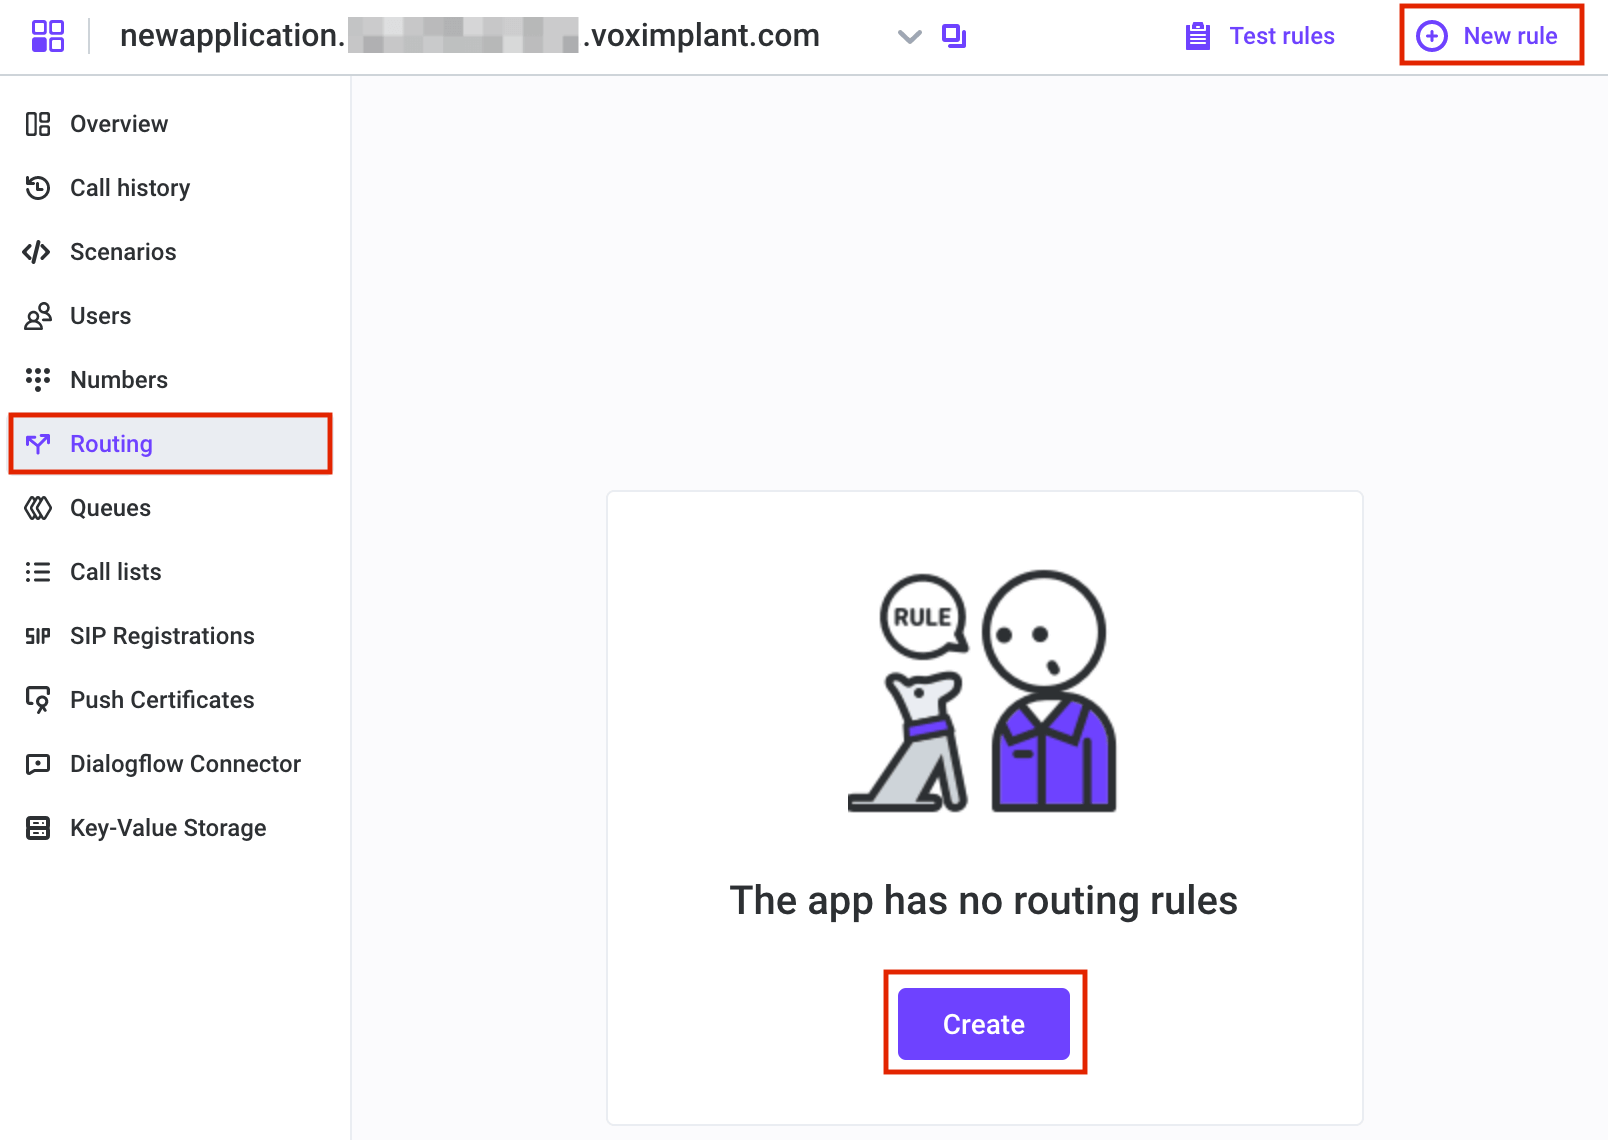
To create a routing rule, navigate to the Routing tab in your application. You can either click Create in the center of the screen or New rule in the upper right corner:

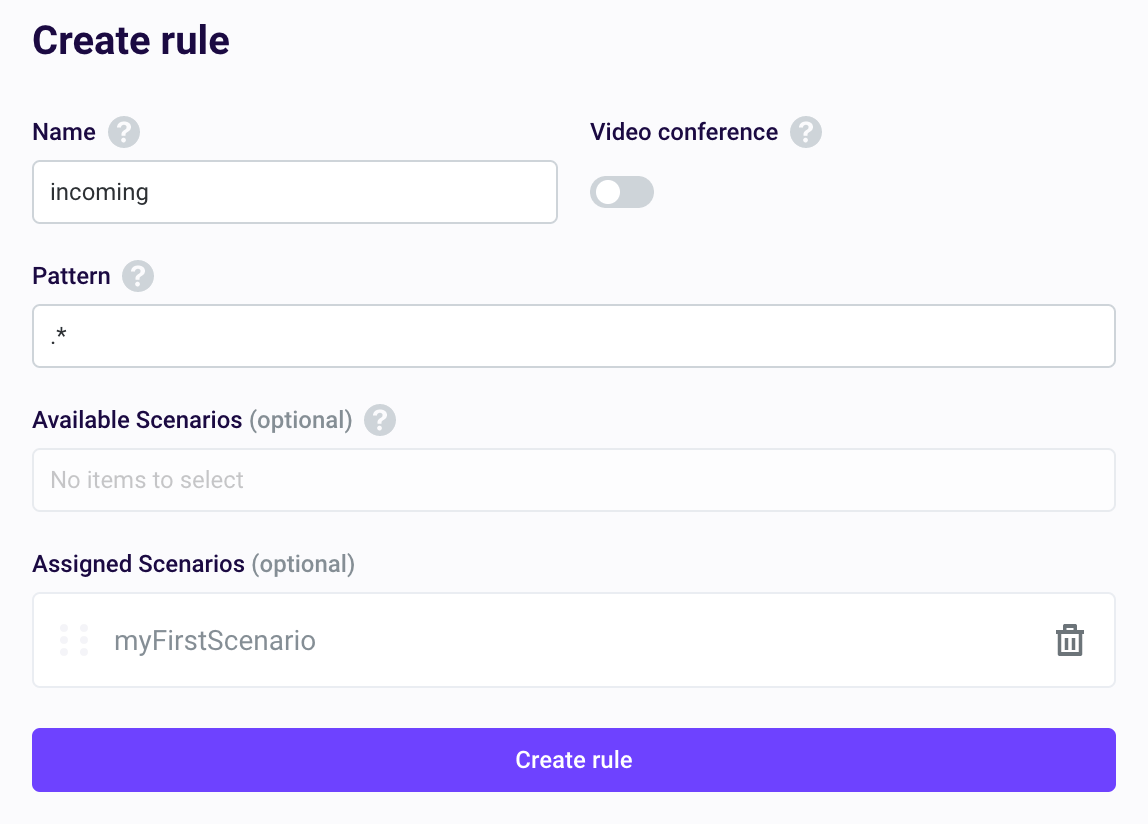
This opens the New rule editor, where you can specify the rule name, properties, and attach one or more scenarios:

If you intend to use the scenario for video conferencing, enable the Video conference switch. Without this parameter, all video conferences fail with an error.
With the Video conference switch enabled, all the calls made via SDKs or softphones are billed as video conferences.
The Pattern field checks if the call’s destination (the dialed number or username specified in the e.destination property of the incoming call) matches any rule’s pattern. If the call’s destination aligns with the pattern, the attached scenario(s) are executed. If the call’s destination doesn’t match the pattern, the attached scenario(s) remain inactive, and the call proceeds to the next routing rule.
The application systematically evaluates the routing rules from top to bottom, with higher-priority rules taking precedence. When the call’s destination matches one of the rules, the rule is executed, and the application disregards any subsequent rules, ensuring that only one rule is executed at a time.
If the destination phone number meets several rules' patterns, only the first rule executes.
The Pattern field employs regular expressions to create masks for phone numbers or usernames. Common expressions include:
.*means any quantity of any symbols, so all the numbers or usernames match the rule.+?[1-9]\d{1,14}matches any phone number123.+matches 1234, 12356, etc., and so on.
For more information on building regular expressions, refer to Wikipedia.
The Available scenarios dropdown list enables you to attach one or more scenarios to execute when the rule is triggered.
You can attach multiple scenarios to a single rule. In this scenario, the rule executes all the attached scenarios sequentially within a single context, promoting code reuse. This allows you to encapsulate all the functions within a scenario and utilize them in another scenario.
You can view all the attached scenarios in the Assigned scenarios field.
After specifying all the settings, click the Create rule button to create a rule.
You can learn more about routing rules and ways to launch them in the Getting started → Routing rules section of this documentation.
Configure your SIP PBX
Your configuration depends on the type of the PBX that you use and internet access that it has
You are using a self-hosted PBX connected to the internet with a fixed public IP address
In this case you need to:
- Whitelist the IP address of your PBX in the Security section of Voximplant Control Panel.
- Configure your PBX to forward calls to the following SIP URI: sip:{number}@{app_name}.{account_name}.voximplant.com.
numbermay be any number or username that matches the regular expression specified earlier when configuring the routing rules.app_nameandaccount_nameare the names of the Voximplant application and account respectively.
You are using cloud PBX
In this case Voximplant can resemble a user in your cloud PBX. So, to complete the configuration you need to:
- Create a user in your cloud PBX accountу.
- Configure your PBX to forward calls that need to be handled by the voice bot to the user you have just created.
- Create a SIP registration with credentials of the created user and the domain name of the cloud PBX instance you use.
- Attach the SIP registration to the application in
SIP registationssection of application configuration. When doing so, select the routing rule for incoming calls created earlier.
Making outgoing calls
Voximplant can initiate outgoing calls to your PBX and join them to the voice agent. This can be done by calling the StartScenarios Management API method from your system and passing the number and caller ID parameters as it is explained below.
Configuring Voximplant account
- Create an application the same way as described above.
- Create a call scenrio. Here is the sample scenario for starting outgoing calls. Please note that Ultravox and PBX connection information need to be provided in the script instead of placeholders.
- Create a routing rule and attach the scenario to it. The rule pattern can be arbitrary in this case because the pattern is only used when processing incoming calls.
Configure your PBX
You can either whitelist the Voximplant SIP IP addresses or create a user in your PBX and use its credentials to authenticate. In the first case you can use the API endpoint to get Voximplant SIP IP addresses. In the latter case you need to pass authentication information to the callSIP function in the secnario.
The outgoing scenario accepts the customData parameter in the following format:
{"callerid":"16503333333", "number":"16504444444"}
You can provide this parameter when launching the scenario via a routing rule or StartScenarios Management API method.
